Understanding Your Dashboard
The Dashboard is your home base on Clases.community. After logging in, this is where you'll land, and it provides a central hub for managing all your communities and accessing key features.
Understanding Your Dashboard
Think of the Dashboard as your command center—it shows all communities you're a member of, provides quick navigation, and gives you easy access to important actions.
Page Layout Overview
Top Header Section:
-
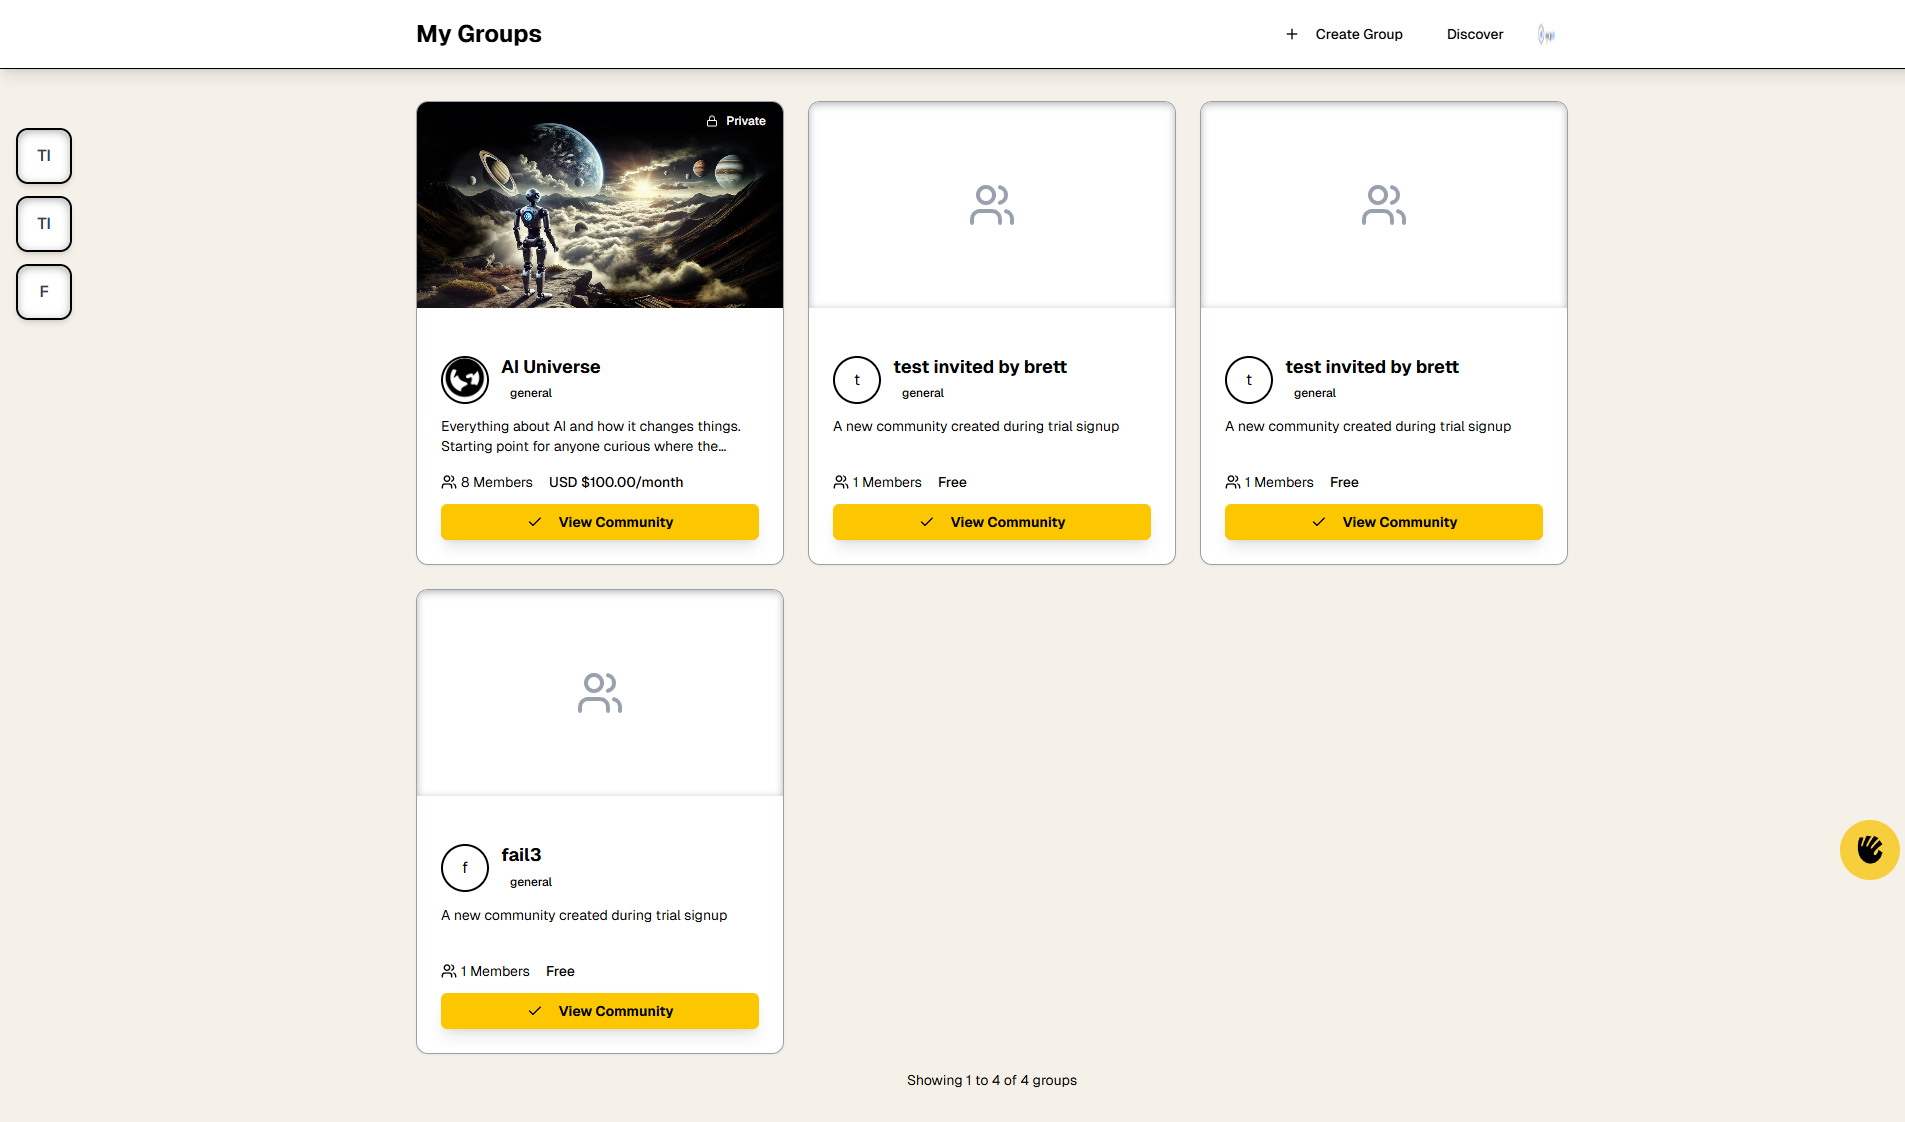
Page Title: "My Groups"
-
Indicates you're viewing all your communities
-
This is your personal collection of joined communities
-
-
Create Group Button (Plus Icon + "Create Group")
-
Location: Top right area of the header
-
Function: Start the process of creating your own community
-
What Happens: Opens the community creation wizard
-
Requirements: You must be logged in
-
When to Use: When you want to build your own community around a topic you're passionate about
-
Tip: Creating a community is free, but you can set it as paid if you want to monetize it
-
-
Discover Button
-
Location: Near the Create Group button
-
Function: Navigate to the Discover page
-
What Happens: Takes you to the page where you can browse and join new communities
-
When to Use: When you want to find and join new communities
-
Tip: Use this regularly to discover new communities that match your evolving interests
-
-
Profile Icon (Your Avatar)
-
Location: Top right corner
-
Function: Access your account menu and settings
-
What Happens: Clicking opens a dropdown menu with:
-
Your email address
-
Profile settings
-
Account settings
-
Affiliates
-
Help center
-
Log out
-
-
See: Accessing Settings for details
-
Left Sidebar Navigation
Quick Access Panel:
-
Purpose: Provides instant navigation to your communities
-
Layout: Vertical list of community shortcuts
-
Display: Shows abbreviated community names or icons
-
Example: "TI" might stand for "Tech Innovators"
-
Example: "F" might stand for "Fitness"
-
-
Functionality:
-
Click any shortcut to jump directly to that community
-
Saves you from scrolling through all your communities
-
Especially useful if you're a member of many communities
-
How It Works:
-
Communities you own typically appear first
-
Then communities you're a member of
-
The sidebar updates automatically as you join/
leave communities -
Tip: Hover over abbreviations to see full community names (if tooltips are available)
Main Content: Community Cards
The center of the Dashboard displays all your communities as cards in a grid layout.
Understanding Community Cards:
Each card represents one community and shows:
-
Group Image/
Banner: -
Large visual at the top of the card
-
Usually the community's banner or featured image
-
Helps you visually identify communities
-
Tip: Community owners can customize these images
-
-
Group Icon:
-
Small circular icon (usually bottom-left of the banner)
-
Shows community logo or initials
-
Appears in a circular badge
-
Used throughout the platform to represent the community
-
-
Group Name:
-
The official name of the community
-
Displayed prominently on the card
-
Example: "AI Universe", "No Code Automations"
-
-
Category Badge:
-
Small colored badge indicating the category
-
Examples: "general", "technology", "business"
-
Helps you quickly identify the type of community
-
-
Description:
-
Brief 1-2 sentence description
-
Gives you a quick reminder of what the community is about
-
Example: "Learn AI agents and automation tools"
-
-
Member Count:
-
Shows how many people are in the community
-
Format: "X Members" (e.g., "8 Members", "156 Members")
-
Helps you gauge community size and activity level
-
-
Pricing Information:
-
"Free": Public, free-to-join community
-
"USD $XX.XX/
month": Paid subscription community -
Important for understanding which communities require payment
-
-
Privacy Badge:
-
"Private" badge appears on private/
paid communities -
Indicates the community is not publicly accessible
-
Only members can see private community content
-
-
View Community Button:
-
Large yellow button at the bottom of the card
-
Action: Click to enter and view the community
-
Takes you to the community's main page (usually the Feed)
-
Tip: This is your primary way to access a community
-
Footer Information
Pagination Display:
-
Shows: "Showing X to Y of Z groups"
-
Example: "Showing 1 to 4 of 4 groups"
-
Meaning:
-
If you have many communities, they'll be paginated
-
Shows which communities are currently visible
-
Use pagination controls (if available) to see more
-
Quick Actions from Dashboard
1. Enter a Community
-
Click "View Community" on any community card
-
Or click the community shortcut in the left sidebar
-
You'll be taken to that community's main page
2. Create a New Community
-
Click "Create Group" button
-
Follow the community creation wizard
-
Set up your community's name, description, pricing, etc.
-
Note: Creating communities is a more advanced feature
3. Discover New Communities
-
Click "Discover" button
-
Browse available communities
-
Join new communities that interest you
-
They'll appear on your Dashboard after joining
4. Access Your Settings
-
Click your profile icon (top right)
-
Select from the dropdown menu:
-
Profile: Edit your profile information
-
Settings: Account and security settings
-
Affiliates: Affiliate program (if applicable)
-
Help center: Platform documentation
-
5. Quick Navigation
-
Use the left sidebar to jump to specific communities
-
Especially useful if you're a member of many communities
-
Saves time compared to scrolling through cards
Dashboard States
Empty Dashboard (New User):
-
If you haven't joined any communities yet, you'll see:
-
An empty state message
-
Suggestions to discover and join communities
-
"Discover" button prominently displayed
-
-
What to Do: Click "Discover" to find your first community
Dashboard with Communities:
-
Shows all your communities as cards
-
Organized in a grid layout
-
Easy to scan and find what you're looking for
-
Tip: Communities you own typically appear first
Many Communities:
-
If you're a member of many communities:
-
Cards are paginated
-
Use pagination controls to navigate
-
Left sidebar becomes even more useful for quick access
-
Tip: Consider organizing by using the Communities tab in settings
-
Tips for Using Your Dashboard
✅ Best Practices:
-
Check Regularly: Visit your Dashboard daily to see updates
-
Use Sidebar: The left sidebar is your fastest way to jump between communities
-
Explore: Don't be afraid to click "Discover" to find new communities
-
Organize: Keep track of which communities are most active for you
💡 Pro Tips:
-
Quick Access: Bookmark your Dashboard URL for easy access
-
Multiple Communities: If you're in many communities, use the sidebar shortcuts
-
Stay Active: Regularly visit communities to stay engaged
-
Create Your Own: Once you're comfortable, consider creating your own community
⚠️ Things to Remember:
-
The Dashboard only shows communities you're a member of
-
You need to join communities before they appear here
-
Paid communities require active subscription to remain accessible
-
Leaving a community removes it from your Dashboard